I have been installing a lot of tempered glass protectors for myself & friends over the past year and a bit. This gives me pleasure to post a short video on How To Install a Tempered Glass Screen Protector. I showcase the installation on the Moto G 3rd Generation or the Moto G3 but the process can be followed for any device.
Let me know your thoughts in the comments.
Hit the thumbs-up if you like it
Subscribe to the channel for future updates
Share the video with your family, friends & social networks.
email: abhinavsg@gmail.com
Google+: +abhinavsg
Twitter: @abhinavsg
Instagram: abhinavsg
Facebook: /sgabhinav
Posts on Machining, Fabrication, Forging, Design & Vocational Training at Chandra Engineers, Durgapur, INDIA.
Featured Post
How to roll back to Marshmallow from Android N developer Preview OTA
How to install Android N Developer Preview OTA: Video Guide Android N Developer Preview OTA Update Page: Android Beta Program OR Alt ...

Thursday, January 28, 2016
Tuesday, January 26, 2016
Moto X Style (Pure) Unboxing & First Boot
#MotoXStyle #MotoXPure #MotoX2015 #MotoX #Moto
Monday, January 25, 2016
Nexus 6P First Boot & Set-Up
Hi guys, my humble effort at filming the first boot & set-up of my Nexus 6P.
Comments are most welcome
Shares will be highly appreciated
More updates will be up soon
#Nexus6P #GoogleNexus6P #Google #Nexus
Comments are most welcome
Shares will be highly appreciated
More updates will be up soon
#Nexus6P #GoogleNexus6P #Google #Nexus
Saturday, January 23, 2016
How To: Create a document in Google docs
Google docs is a very useful online Document creation & collaboration tool, which can be accessed using a PC/Laptop/Mobile Device. It is also very useful for users who need a basic Word Processing app but do not want to bother installing one on their PC/Laptop/Mobile Device. In addition to just creating or editing documents, Google Docs is particularly useful for sharing documents & accessing them from any PC/Laptop/Mobile Device.
One can easily create a Document & collaborate using the guide, as follows:
Step 1: Open any web browser (I have used google chrome for this post) & type in the url docs.google.com in the address bar.
Step 2: A new web page opens up & asks for your Google Account credentials (username & password). Log in into the Google account, you wish to use.
Step 3: Once logged in, the following page opens up. You can choose from one of the pre-defined templates for documents or just create a new Blank Document & that's what we are going to do. Click on the "+" sign on the "Blank" document.
A new Blank Document opens up. This is how a new Black Document looks like.
Step 4: Choose a file name for your new Document. This can be done later as well but let's just name our new Document, "Test Document". Notice how the file name is assigned to "Untitled Document" by default(refer to the screenshot just above Step 4), we have to click on "Untitled Document" & type in "Test Document" (or whatever we want our file name to be)
Step 5: Start typing. Use the various document formatting options available. One has to fiddle around a bit to check all the available options. Notice how similar things look as compared to any other Word Processing software. We have a Menu Bar, and an options & formatting bar. The best part is, things get Auto-Saved in real time, as you are editing the document.
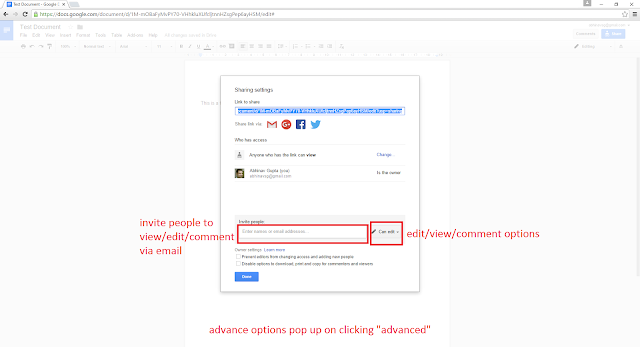
Step 6: Once the document is ready, it can be easily shared with others via email or simply using a hyper link to the document. The owner of the Document can decide if they want others to edit, suggest or just read/print their creation. Have a look at the screenshots below, which are pretty much "self-explanatory", these showcase various options available. Pick the ones, best suited to your requirements.
Step 7: Once a document is created, it will be saved in the Google Account's Google Drive. The owner can always re-open their documents for future edits. They just have to log in into docs.google.com or drive.google.com where they will find their documents listed. A quick double click on the document will open it up, for further processing.
Hope this was helpful. Comments are most welcome. One can always subscribe for future updates. Shares will be highly appreciated as well.
Thanks
#GoogleDocs #Document #Docs #HowTo #Tutorial
Monday, January 18, 2016
NSHM Students Project Work
Dear NSHM Students,
It's been a pleasure working with you guys, since 04 Jan 2016. We have almost come to the end of the 15 Days Vocational Training.
You have been assigned a small Project of making a Flange, 1-1/2 inches, as per BS 10, Table D (refer to the picture). Every student has to make a "to the scale" manufacturing drawing, in an A4 Size sheet of Paper, of the Flange. The Flange will then be made, as per the drawing.
Link to BS 10 Table D
The Inside Diameter of the Flange will be 1-15/16 inches.
The Bolt Holes will be 9/16 inches in diameter.
Good Luck.
Tuesday, January 05, 2016
Machined Bolts & Nuts. Vocational Training 19 Dec 2015 02 Jan 2016
Towards the end of their 15 Days Vocational Training, the 2nd Year Mech. Engineering students machined 3/4" BSW Nuts & Bolts out of a 40mm diameter steel round. They were very satisfied with the end result & so was their instructor.
Double Enveloping Globoid Worm
Chandra Engineers is one of the very few manufacturers of Double Enveloping Worms & Worm Gears (worm wheels), also knows as Globoid Worms & Worm Gears (worm wheels), in the world. Let us know if you want to get it made. contact abhinavsg@gmail.com
P.S. Had very limited footage of the manufacturing process, might post a video featuring the whole process, in future.
P.S. Had very limited footage of the manufacturing process, might post a video featuring the whole process, in future.
Friday, January 01, 2016
Subscribe to:
Comments (Atom)


